Categories
- Pipe & Tube (18)
- Flange & Fitting (97)
- Fastener & Gasket (12)
- Valve & Pump (18)
- Base Material (11)
- Equipment (8)
- Application (31)
- Technical (110)
ASME B18.2.1 is the standard specification covering the dimensional requirements for nine products types of inch series bolts and screws recognized as American National Standard. All dimensions of bolts and screws conforming to this standard are in inches and apply to unplated and uncoated product. When plating or coating is specified, the finished product dimensions shall be as agreed upon between supplier and purchaser. A bolt is an externally threaded fastener, generally used with a nut. It fits in an over-sized hole and is tightened by an end nut. A screw is also an externally threaded fastener, generally used without a nut. It normally fits in a threaded hole.
| ASME B18.2.1 Nine Types of Bolts & Screws | ||
|---|---|---|
| Square Head Bolt | Hex Bolt | Heavy Hex Bolt |
| Askew Head Bolt | Hex Cap Screw | Heavy Hex Screw |
| Hex Flange Screw | Lobed Head Screw | Lag Screw |
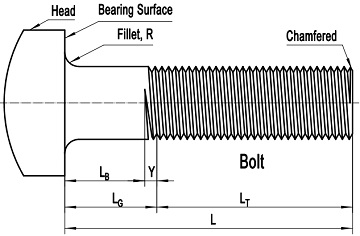
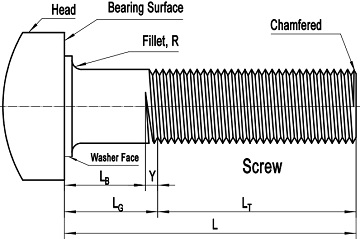
Bolts and screws manufactured in accordance with ASME B18.2.1 are all headed fasteners. The terminology “headed” indicates the basic construction style of the fastener, which is a partly or fully threaded rod or shank with a head. The head may be manufactured to various types such as square, hex, hex flange, and lobed, etc. Top of the head shall be full form and chamfered, with the diameter of chamfer circle equal to the maximum width across flats. The head height shall include the thickness of the washer face where provided. Besides, the head may be cross-drilled for self-locking purpose. Generally, the under-head surface and the washer face (if provided) are called bearing surface. As illustrated in Figure-1 and Figure-2, a fillet shall be furnished so that the head-to-shank transition can be more smooth which means low stress concentration.

Figure-1: a typical drawing of headed bolt conforming to ASME B18.2.1
The body style furnished shall be either full size body or reduced body at the discretion of purchaser. The end of the shank shall be pointed (chamfered). The chamfer angle may vary depending on specific manufacturing process. The presence of the pointed end is to reduce the possibility of damage to the leading threads and to promote ease of assembly with a tapped hole or nut. The bolt or screw may be furnished in “full thread” (threaded for full length) or “half thread” (not threaded for full length, partly threaded) construction. The threads shall meet the requirements of ASME B1.1 except that lag screw thread dimensions are otherwise specified. Thread series on the bolts and screws may be coarse (UNC), fine (UNF), or 8 thread series (8 UN), except askew head bolts, which shall be unified coarse (UNC) only, and lag screws, which are otherwise specified.

Figure-2: a typical drawing of headed screw conforming to ASME B18.21.
The first step in manufacturing of any bolt or screw is to cut the round bar to length. This process can be completed by either a shearing machine or a cutting saw. One end of the round bar is subsequently headed/ forged by an upsetter, in either hot forge or cold-worked conditions. Conventionally, round bars in diameter of 1″ and smaller shall be cold worked in the upsetter. When the diameter is larger than 1″, the round bar shall be preheated before forging by an induction coil to a specific temperature depending on material grade. The other end of the round bar shall be pointed (chamfered) prior to threading. The key process in manufacturing a bolt or screw is threading. Rolled threading and cut threading are the two major and different threading methods. Rolled threading is an extrusion process in which reduced body round bar is forced between two dies which displace the metal to form the threaded portion of the fastener, rather than cutting away the metal to form the thread. In cut threading process, the metal round bar is fed through a threader (threading machine) in which the metal is cut away from the round bar by thread chasers to form the threads.
According to ASME B18.2.1, the bolts and screws are routinely supplied with a plain (as processed) finish, unplated or uncoated. Upon client’s request, they can be furnished in various coatings such as light anti-rust oil coating, hot dipped galvanization, electrolytic zinc plating, cadmium plating, Xylan coating, PTFE coating (Teflon), zinc-aluminum coating, black oxide coating, and various powder coating, etc.
The ASME B18.2.1 bolts and screws may be manufactured from a comprehensive range of materials covering carbon steel, alloy steel, stainless steel, and nonferrous metal (Ti, Ni, Cu, Zr, etc). The typical standard specifications are listed in below table:
| Material Standards for ASME B18.2.1 Fasteners | |
|---|---|
| ASTM A193 | Standard specification for alloy steel and stainless steel bolting materials for high temperature or high pressure service and other special purpose applications |
| ASTM A307 | Standard specification for carbon steel bolts and studs, 60000 psi tensile strength |
| ASTM A320 | Standard specification for alloy steel and stainless steel bolting for low-temperature service |
| ASTM A354 | Standard specification for quenched and tempered alloy steel bolts, studs, and other externally threaded fasteners |
| ASTM A449 | Standard specification for hex cap screws, bolts and studs, steel, heat treated, 120/105/90 ksi minimum tensile strength, general use |
| ASTM F468 | Standard specification for nonferrous bolts, hex cap screws, and studs for general use |
| ASTM F593 | Standard specification for stainless steel bolts, hex cap screws, and studs |
| MIL-F-18240 | Fastener element, self-locking, threaded fastener, 250°F Maximum |
| SAE J429 | Mechanical and material requirements for externally threaded fasteners |
Conventionally: (1) All bolts except heavy hex bolts shall be furnished in ASTM A307 Grade A, or ASTM A354 Grade BC or BD; heavy hex bolts shall be conforming to ASTM A307 Grade B. (2) Hex head cap screws may be furnished in all grades of SAE J429 and ASTM A449, stainless steel of ASTM F593, nonferrous materials of ASTM F468. Heavy hex head cap screws may be furnished in all material grades in ASTM A193 and ASTM A320. Hex flange and lobed head screws are available in all carbon and alloy steel grades of SAE. (3) Lag screws are available in carbon steel ASTM A307 Grade A, stainless steel F593 Group 1, CW 304, and nonferrous materials of ASTM F468.
As illustrated in Figure-1 and Figure-2, there 5 important dimensions for each bolt or screw conforming to ASME B18.2,1. The bolt or screw length, L: the distance measured parallel to the axis of fastener from the bearing surface of the head to the extreme end of the bolt or screw, including the point if the fastener is pointed. The grip gaging length, LG: the distance measured parallel to the axis of the bolt or screw from the under-head bearing surface to the face of the appropriate non-counterbored, non-countersunk special GO thread ring gage. The body length, LB: the distance measured parallel to the axis of the bolt or screw from the under-head bearing surface to the last scratch of thread or, for rolled threads, to the top of the extrusion angle. The nominal thread length, LT: the length from the extreme point of the bolt or screw to the last complete thread. The transition thread length, Y: the length that includes the length of incomplete threads, the extrusion angle on rolled threads, and tolerances on grip length. Generally, the correlations between these dimensions are presented as: LG = L – LT and LB = LG – Y (both LT and Y are reference dimensions intended for calculation purposes only).
The bolts or screws shall be manufactured in accordance with respective material specifications. They not only shall meet all dimensional requirements specified by ASME B18.2.1 but also shall be conforming to the gaging requirements of ASME B1.1, ASME B1.2, ASME B1.3, and ASME B18.2.9. The tolerances shall be in accordance with ASME Y14.5.
